Crocheting a little star feels like capturing a bit of holiday magic. These three patterns are designed with beginners in mind, using simple stitches that come together quickly. You’ll be able to make a whole handful of them to decorate your tree or give as thoughtful, handmade gifts. They work up fast, so you can even make them last-minute! Yarn and Hook Recommendations For these star ornaments, you’ll want a yarn that has a nice crispness to it, something that will hold the star’s shape well. Worsted weight cotton yarn is a fantastic choice for this. It’s durable, washable, and comes in so many beautiful colors. Think traditional Christmas red, green, and white, but also consider metallic gold or silver for a bit of sparkle, or even pretty blues and purples if you’re going for a winter wonderland theme. If you’re using acrylic yarn, a standard worsted weight will also work, but you might find you need to block your finished stars to get them to lie flat and look their best. Avoid fuzzy yarns like eyelash or novelty yarns for these patterns, as they can hide the stitch definition and make the stars harder to work. The hook size will depend on your yarn, but a good starting point for worsted weight yarn is a 5mm (H-8) crochet hook. Always check your yarn label for the recommended hook size. Using a hook that’s a bit smaller than recommended can help create a denser fabric, which is excellent for keeping those star points sharp and defined. You can also use a slightly larger hook if you prefer a softer, more flexible ornament, but keep in mind it might need more careful blocking. For any of these stars, you’ll mostly be using basic stitches like the single crochet, double crochet, and chain stitch. Some might incorporate a slip stitch or a puff stitch for a bit of texture, but don’t worry, I’ll guide you through each one. We’ll also cover how to create those lovely star points and how to finish them off neatly for hanging.
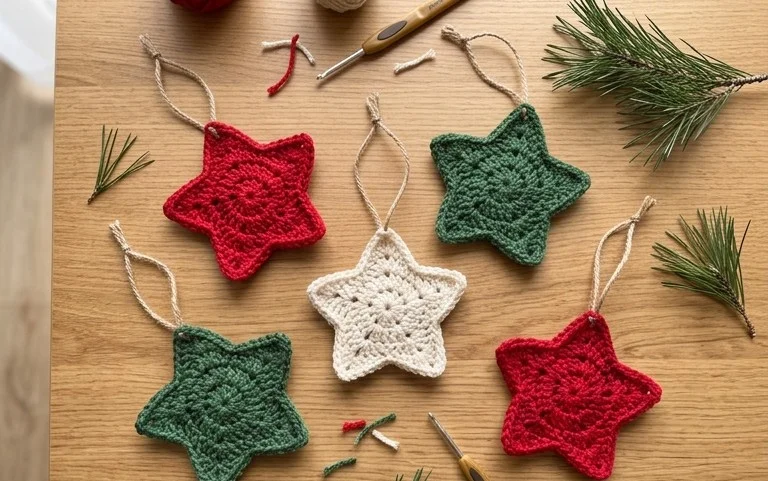
3 Easy Crochet Christmas Star Ornament Patterns for Beginners
Crocheting a little star feels like capturing a bit of holiday magic. These three patterns are designed with beginners in mind, using simple stitches that come together quickly. You’ll be able to make a whole handful of them to decorate your tree or give as thoughtful, handmade gifts. They work up fast, so you can even make them last-minute!
Yarn and Hook Recommendations
For these star ornaments, you’ll want a yarn that has a nice crispness to it, something that will hold the star’s shape well. Worsted weight cotton yarn is a fantastic choice for this. It’s durable, washable, and comes in so many beautiful colors. Think traditional Christmas red, green, and white, but also consider metallic gold or silver for a bit of sparkle, or even pretty blues and purples if you’re going for a winter wonderland theme.
If you’re using acrylic yarn, a standard worsted weight will also work, but you might find you need to block your finished stars to get them to lie flat and look their best. Avoid fuzzy yarns like eyelash or novelty yarns for these patterns, as they can hide the stitch definition and make the stars harder to work.
The hook size will depend on your yarn, but a good starting point for worsted weight yarn is a 5mm (H-8) crochet hook. Always check your yarn label for the recommended hook size. Using a hook that’s a bit smaller than recommended can help create a denser fabric, which is excellent for keeping those star points defined.
Stitch Techniques You’ll Use
These patterns rely on some fundamental crochet stitches that are perfect for beginners to practice.
- Chain (ch): This is the very first stitch you learn in crochet and forms the foundation for many other stitches.
- Slip Stitch (sl st): A short stitch used to join pieces, move across stitches without adding height, or create a neat edge.
- Single Crochet (sc): A basic, dense stitch that creates a firm fabric.
- Half Double Crochet (hdc): Taller than a single crochet, but shorter than a double crochet, giving a nice balance of height and density.
- Double Crochet (dc): A taller stitch that works up quickly and creates a slightly more open fabric.
- Treble Crochet (tc) / Double Treble Crochet (dtr): These are even taller stitches. You’ll use them in some of the star points to make them longer and more distinct. For a treble crochet, you yarn over twice before inserting your hook. For a double treble crochet, you yarn over three times.
- Working in the Round: You’ll often start these stars with a magic ring or a chain 2, then work stitches into that small circle. This is how you begin to create flat, circular or star-shaped pieces.
- Working into a Chain Space: Sometimes, instead of working into individual stitches, you’ll work into the spaces created by chain stitches from a previous round. This is common for forming the points of the star.
Tips for Beginners
Don’t be discouraged if your first few stitches aren’t perfect. Everyone starts somewhere!
- Tension is Key: Try to keep your yarn tension as consistent as possible. If your stitches are too loose, the star might be floppy. If they’re too tight, it can be hard to get your hook through the stitches. It takes practice, so just keep crocheting!
- Use a Stitch Marker: For working in the round, especially when you don’t join with a slip stitch to the beginning chain, a stitch marker is your best friend. Place it in the first stitch of each round so you know exactly where to start and stop.
- Read Ahead: Before you start a row or round, read the instructions completely. This helps you understand what’s coming next and avoid mistakes.
- Count Your Stitches: It’s easy to accidentally skip a stitch or add an extra one, especially when you’re learning. Regularly counting your stitches will save you from having to unravel your work later.
- Don’t Be Afraid to Unravel (Frogging): If you make a mistake, it’s okay! Gently pull out your yarn until you get back to where the error occurred and try again. It’s part of the learning process.
- Weave in Ends Securely: When you finish crocheting, you’ll have yarn tails to weave in. Use your crochet hook to thread the tail back and forth through the stitches on the wrong side of your work. Do this a few times in different directions to make sure it doesn’t come undone.
How to Customize Your Stars
These patterns are wonderfully adaptable!
Colors
This is where you can really have fun.
- Classic Christmas: Red, green, white, gold, silver.
- Winter Wonderland: Shades of blue, white, silver, pale grey.
- Festive & Fun: Bright pinks, teals, purples, or any combination that makes you happy.
- Ombre Effect: If you have a gradient yarn, it can create a beautiful color transition within a single star.
- Two-Tone: You can change yarn colors between rounds to create striped or color-blocked stars. Just make sure to weave in your ends carefully when you change colors.
Sizes
The size of your star is primarily determined by your yarn and hook choice, and how many rounds you work.
- Smaller Stars: Use a finer weight yarn (like sport weight or DK) and a smaller hook (around 3mm to 4mm). You might also work fewer rounds for the points. These are great for garlands or to attach to gift tags.
- Larger Stars: Use a bulkier yarn (like bulky or super bulky) and a larger hook (6mm or higher). You might need to adjust stitch counts in some rounds to keep the star shape, or simply work more rounds to build up the size. These make lovely larger tree decorations or even small placemats.
- Adjusting Point Length: If you want longer or shorter points on the stars you’re making, you can often do this by adding or subtracting a chain stitch at the beginning of a point or by adding/removing an extra treble or double treble crochet stitch within the point section. Always check that the rest of the round still lines up correctly after making such a change.
Care Instructions for Finished Ornaments
Since these are decorative ornaments, care is usually minimal.
- Cleaning: If your ornaments get a bit dusty, you can gently brush them with a soft brush or use a lint roller. For more significant dirt, a gentle hand wash with cool water and a mild soap can be done. Squeeze out excess water gently (don’t wring them out) and lay them flat on a clean towel to air dry. Cotton yarn holds up well to washing.
- Blocking: After washing, or even if they just seem a little misshapen, blocking is highly recommended, especially for cotton. Lay the star flat on a blocking mat or a clean towel, gently shape it into the desired star form, and pin the points in place. Let it dry completely. You can also use a bit of spray starch for extra crispness.
- Storage: Store your finished ornaments in a dry place, perhaps in a breathable fabric bag or a box, away from direct sunlight and moisture. This will help preserve their colors and shape for many holidays to come.
Project Ideas for Your Crocheted Stars
Once you’ve made a few, you’ll want to find all sorts of places to put them!
- Tree Ornaments: This is the classic use. Add a loop of yarn or ribbon to the top of each star for hanging.
- Garlands: String multiple stars together to create a beautiful, handmade Christmas garland for your mantel or windowsill.
- Gift Toppers: Instead of a bow, attach a small crocheted star to the top of your wrapped gifts for a personal touch.
- Table Scatter: Place a few stars on your holiday table runner or centerpiece for a festive touch.
- Bookmark: A small, single-pointed star can be used as a cute and functional bookmark.
- Appliqués: Sew or glue them onto stockings, tree skirts, or even plain fabric bags to add some festive flair.
- Wreath Decoration: Glue them onto a plain wreath form or weave them into a pre-made wreath.
- Mobiles: Hang several stars from a hoop or a branch to create a charming Christmas mobile for a nursery or a window.
Crocheting these little stars is a wonderfully satisfying way to embrace the holiday spirit. Enjoy the process and the beautiful results!
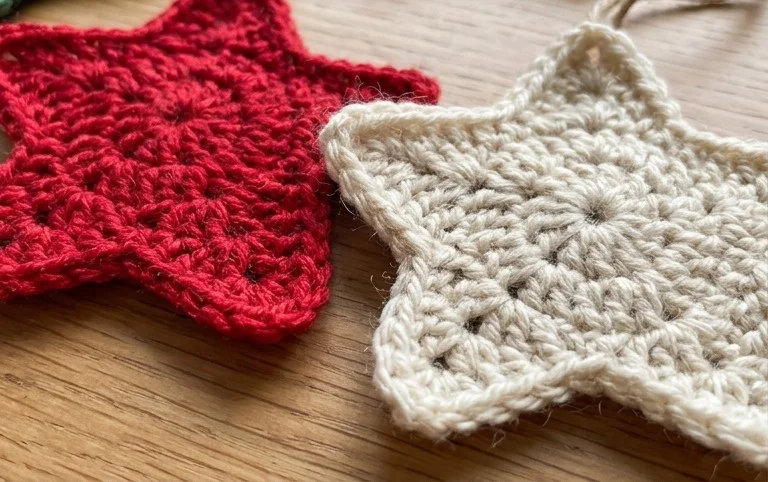
Once you’ve got your yarn and hook ready, these three crochet star patterns are waiting for you. They’re a wonderful way to add some handmade charm to your holiday decorations or to create quick, thoughtful gifts for friends and family. Don’t be afraid to experiment with different yarn colors and weights to see how your stars change. Maybe you’ll add a touch of sparkle with metallic thread or create a whole celestial display with blues and purples. If you make some of these stars, I’d love to see them! Share a picture on social media and tag me so I can see your beautiful creations. For more festive projects, feel free to browse the other patterns here on the blog. Happy crocheting, and happy holidays!